Scenario
We would like to expose additional information on the search results page and to be able to search using specific properties.
Solution
Set up custom metadata property mappings for search.
I will use the form library described here and custom search page described here.
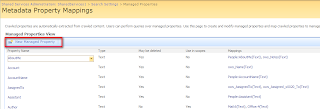
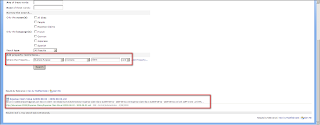
1. Go to Shared Service Provider Settings -> Search Settings -> Metadata Property Mappings and click New Managed Property button:
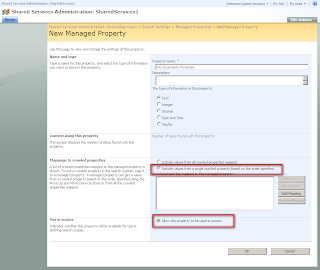
2. Provide name for managed property, specify that you will provide mappings to crawled properties and tick the checkbox that you will use this mapping in scopes. I will use Business Purpose column from the my Expense Claims form library therefore I will call my managed property "VG Business Purpose". Click "Add Mapping" button:
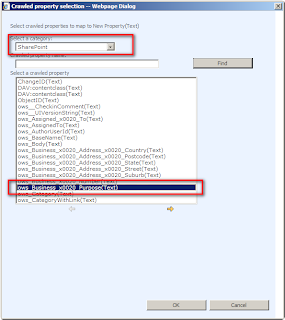
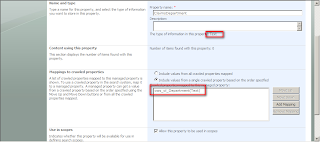
3. In the Crawled Property Selection dialog select SharePoint category and browse for the desired metadata crawled property. Usually the crawled property name has the following format: "ows_ColumnInternalName". In column internal names space is replaced with "_x0020_". To simplify the task of determining what is your property my suggestion will be to use prefixes for column names in your libraries and lists. Say "Claim_" or "SalesReport_". In that situation you would be able to search for the appropriate columns easily. My situation is "ows_Business_x0020_Purpose". Select the right property and click OK button:
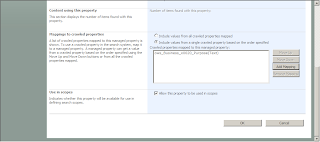
4. You can add more mappings if you want. When you finish click OK button:
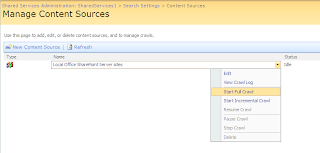
5. Go to Shared Service Provider settings -> Search Settings -> Content Sources and for the main content source run the full crawl in order to get values for your newly created managed property:
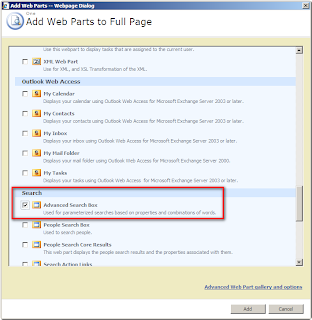
6. We need to add Advanced Search Box on the search page in order to search using new managed property. Got to the search page and edit it. Then click Add Web Part button where you want to add Advanced Search Box:
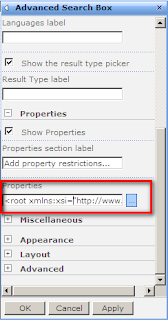
7. In the Web part properties in the Properties section select the button to edit the XML for managed properties:
8. Don't edit XML in the pop-up editor, because if you make a mistake - which is very easy in this situation - you can hardly say what went wrong. It's better to select the text, copy it and paste to good XML editor. I will use Visual Studio 2008.
Copy from here:
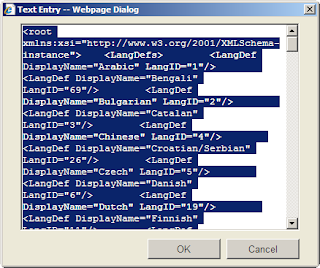
and paste here:

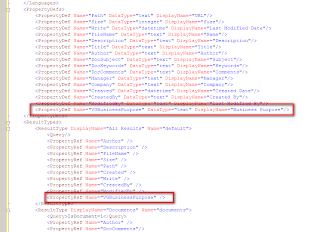
9. Add PropertyDef element to the PropertyDefs element with the "Name" attribute equal to the name of you managed property - VGBusinessPurpose in my case, "DataType" equal to data type of the property - Text in my case, "DisplayName" whatever appropriate - Business Purpose in my case. Add PropertyRef element to the ResultTypes/ResultType element for each result type you will use in your search with "Name" attribute equal to the name of the managed property - VGBusinessPurpose in my case:
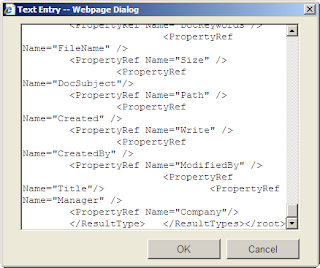
10. Select all of the text you have just edited, copy and paste back to the pop-up text editor:
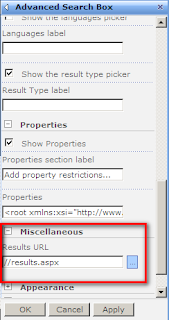
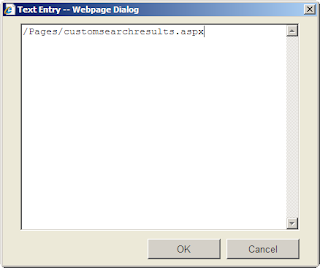
11. In the Miscellaneous section of Web part properties specify Results URL. In my case it will be the URL of the page I edit - "/Pages/customsearchresults.aspx". Press OK button:
12. Apply Web part settings and exit edit mode.
13. Try to search. Select your property from the properties dropdown, specify value and hit search button. You shall see the result if everything is OK - like in my situation:
14. Using the same idea I added three more managed properties - ClaimsDepartment, ClaimsEmployeeName, ClaimsTotal:
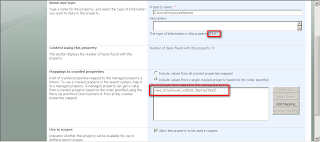
16. Just a quick one: when you create a new managed property and select property type SharePoint filters crawled properties for mapping accordingly.
That's how it looks for the Text field:


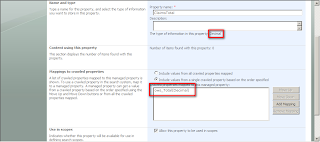
And that's how it looks for Integer field for example:


That means when you select one type in the property parameters you will not see crawled properties of other types in the list of available mappings.
Enjoy! :)
Stay tuned for more.
In the meantime please have a look at the books below:
We would like to expose additional information on the search results page and to be able to search using specific properties.
Solution
Set up custom metadata property mappings for search.
I will use the form library described here and custom search page described here.
1. Go to Shared Service Provider Settings -> Search Settings -> Metadata Property Mappings and click New Managed Property button:

2. Provide name for managed property, specify that you will provide mappings to crawled properties and tick the checkbox that you will use this mapping in scopes. I will use Business Purpose column from the my Expense Claims form library therefore I will call my managed property "VG Business Purpose". Click "Add Mapping" button:

3. In the Crawled Property Selection dialog select SharePoint category and browse for the desired metadata crawled property. Usually the crawled property name has the following format: "ows_ColumnInternalName". In column internal names space is replaced with "_x0020_". To simplify the task of determining what is your property my suggestion will be to use prefixes for column names in your libraries and lists. Say "Claim_" or "SalesReport_". In that situation you would be able to search for the appropriate columns easily. My situation is "ows_Business_x0020_Purpose". Select the right property and click OK button:

4. You can add more mappings if you want. When you finish click OK button:

5. Go to Shared Service Provider settings -> Search Settings -> Content Sources and for the main content source run the full crawl in order to get values for your newly created managed property:

6. We need to add Advanced Search Box on the search page in order to search using new managed property. Got to the search page and edit it. Then click Add Web Part button where you want to add Advanced Search Box:

7. In the Web part properties in the Properties section select the button to edit the XML for managed properties:

8. Don't edit XML in the pop-up editor, because if you make a mistake - which is very easy in this situation - you can hardly say what went wrong. It's better to select the text, copy it and paste to good XML editor. I will use Visual Studio 2008.
Copy from here:

and paste here:

9. Add PropertyDef element to the PropertyDefs element with the "Name" attribute equal to the name of you managed property - VGBusinessPurpose in my case, "DataType" equal to data type of the property - Text in my case, "DisplayName" whatever appropriate - Business Purpose in my case. Add PropertyRef element to the ResultTypes/ResultType element for each result type you will use in your search with "Name" attribute equal to the name of the managed property - VGBusinessPurpose in my case:

10. Select all of the text you have just edited, copy and paste back to the pop-up text editor:

11. In the Miscellaneous section of Web part properties specify Results URL. In my case it will be the URL of the page I edit - "/Pages/customsearchresults.aspx". Press OK button:


12. Apply Web part settings and exit edit mode.
13. Try to search. Select your property from the properties dropdown, specify value and hit search button. You shall see the result if everything is OK - like in my situation:

14. Using the same idea I added three more managed properties - ClaimsDepartment, ClaimsEmployeeName, ClaimsTotal:


16. Just a quick one: when you create a new managed property and select property type SharePoint filters crawled properties for mapping accordingly.
That's how it looks for the Text field:


And that's how it looks for Integer field for example:


That means when you select one type in the property parameters you will not see crawled properties of other types in the list of available mappings.
Enjoy! :)
Stay tuned for more.
In the meantime please have a look at the books below:
Comments
Post a Comment